> ## Documentation Index
> Fetch the complete documentation index at: https://dify-6c0370d8-docs-new-agent-experience.mintlify.site/llms.txt
> Use this file to discover all available pages before exploring further.
# Tool OAuth
> 用 OAuth 授权流程替代手动输入 API 密钥,让用户一键授权访问第三方服务
> 本文档由 AI 自动翻译。如有任何不准确之处,请参考 [英文原版](/en/develop-plugin/dev-guides-and-walkthroughs/tool-oauth)。
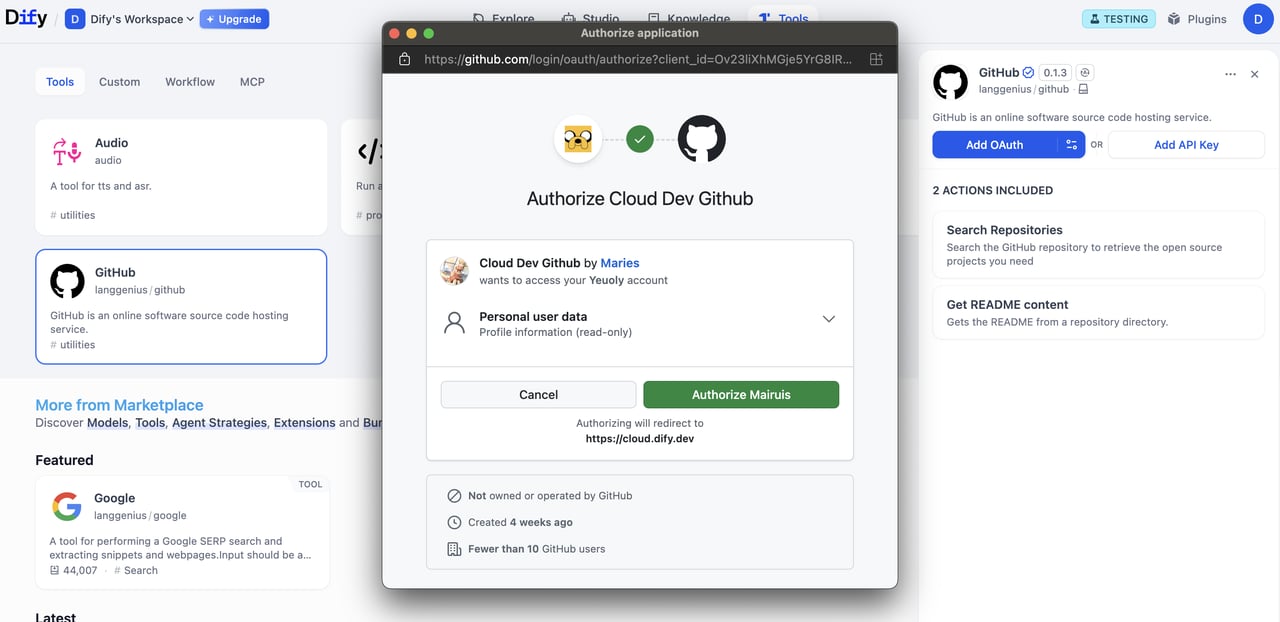 本指南将教你如何为工具插件构建 [OAuth](https://oauth.net/2/) 支持。
OAuth 是为需要访问第三方服务(如 Gmail 或 GitHub)用户数据的工具插件提供授权的更好方式。OAuth 允许工具在用户明确同意的情况下代表用户执行操作,而无需用户手动输入 API 密钥。
## 背景
Dify 中的 OAuth 涉及**两个独立的流程**,开发者需要理解并为其进行设计。
```mermaid theme={null}
sequenceDiagram
autonumber
participant Admin as Admin / Developer
participant Service as Third-party Service
participant Dify
participant User
rect rgb(235, 245, 255)
Note over Admin,Dify: Flow 1: One-time OAuth client setup
Admin->>Service: Register OAuth app
Service-->>Admin: client_id + client_secret
Admin->>Dify: Configure plugin OAuth client
end
rect rgb(245, 255, 235)
Note over User,Service: Flow 2: Per-user authorization
User->>Dify: Click "Authorize"
Dify->>Service: Redirect to consent screen
User->>Service: Approve
Service-->>Dify: Authorization code
Dify->>Service: Exchange for access token
Service-->>Dify: Access + refresh tokens
Dify-->>User: Tool ready to use
end
```
### 流程 1:OAuth 客户端设置(管理员/开发者流程)
在 Dify Cloud 上,Dify 团队会为热门工具插件创建 OAuth 应用并设置 OAuth 客户端,省去用户自行配置的麻烦。
自部署 Dify 实例的管理员必须完成此设置流程。
Dify 实例的管理员或开发者首先在第三方服务上将 OAuth 应用注册为受信任的应用程序,由此获取将 Dify 工具提供者配置为 OAuth 客户端所需的凭证。
以下是为 Dify 的 Gmail 工具提供者设置 OAuth 客户端的步骤示例:
1. 前往 [Google Cloud Console](https://console.cloud.google.com) 创建新项目,或选择现有项目。
2. 启用所需的 API(例如 Gmail API)。
1. 导航至 **APIs & Services** > **OAuth consent screen**。
2. 为公共插件选择 **External** 用户类型。
3. 填写应用名称、用户支持邮箱和开发者联系方式。
4. 如需要,添加授权域名。
5. 测试阶段:在 **Test users** 部分添加测试用户。
1. 前往 **APIs & Services** > **Credentials**。
2. 点击 **Create Credentials** > **OAuth 2.0 Client IDs**。
3. 选择 **Web application** 类型。
4. 将生成 `client_id` 和 `client_secret`。保存这些凭证。
在 OAuth 客户端配置弹窗中输入 `client_id` 和 `client_secret`,以将工具提供者设置为客户端。
本指南将教你如何为工具插件构建 [OAuth](https://oauth.net/2/) 支持。
OAuth 是为需要访问第三方服务(如 Gmail 或 GitHub)用户数据的工具插件提供授权的更好方式。OAuth 允许工具在用户明确同意的情况下代表用户执行操作,而无需用户手动输入 API 密钥。
## 背景
Dify 中的 OAuth 涉及**两个独立的流程**,开发者需要理解并为其进行设计。
```mermaid theme={null}
sequenceDiagram
autonumber
participant Admin as Admin / Developer
participant Service as Third-party Service
participant Dify
participant User
rect rgb(235, 245, 255)
Note over Admin,Dify: Flow 1: One-time OAuth client setup
Admin->>Service: Register OAuth app
Service-->>Admin: client_id + client_secret
Admin->>Dify: Configure plugin OAuth client
end
rect rgb(245, 255, 235)
Note over User,Service: Flow 2: Per-user authorization
User->>Dify: Click "Authorize"
Dify->>Service: Redirect to consent screen
User->>Service: Approve
Service-->>Dify: Authorization code
Dify->>Service: Exchange for access token
Service-->>Dify: Access + refresh tokens
Dify-->>User: Tool ready to use
end
```
### 流程 1:OAuth 客户端设置(管理员/开发者流程)
在 Dify Cloud 上,Dify 团队会为热门工具插件创建 OAuth 应用并设置 OAuth 客户端,省去用户自行配置的麻烦。
自部署 Dify 实例的管理员必须完成此设置流程。
Dify 实例的管理员或开发者首先在第三方服务上将 OAuth 应用注册为受信任的应用程序,由此获取将 Dify 工具提供者配置为 OAuth 客户端所需的凭证。
以下是为 Dify 的 Gmail 工具提供者设置 OAuth 客户端的步骤示例:
1. 前往 [Google Cloud Console](https://console.cloud.google.com) 创建新项目,或选择现有项目。
2. 启用所需的 API(例如 Gmail API)。
1. 导航至 **APIs & Services** > **OAuth consent screen**。
2. 为公共插件选择 **External** 用户类型。
3. 填写应用名称、用户支持邮箱和开发者联系方式。
4. 如需要,添加授权域名。
5. 测试阶段:在 **Test users** 部分添加测试用户。
1. 前往 **APIs & Services** > **Credentials**。
2. 点击 **Create Credentials** > **OAuth 2.0 Client IDs**。
3. 选择 **Web application** 类型。
4. 将生成 `client_id` 和 `client_secret`。保存这些凭证。
在 OAuth 客户端配置弹窗中输入 `client_id` 和 `client_secret`,以将工具提供者设置为客户端。
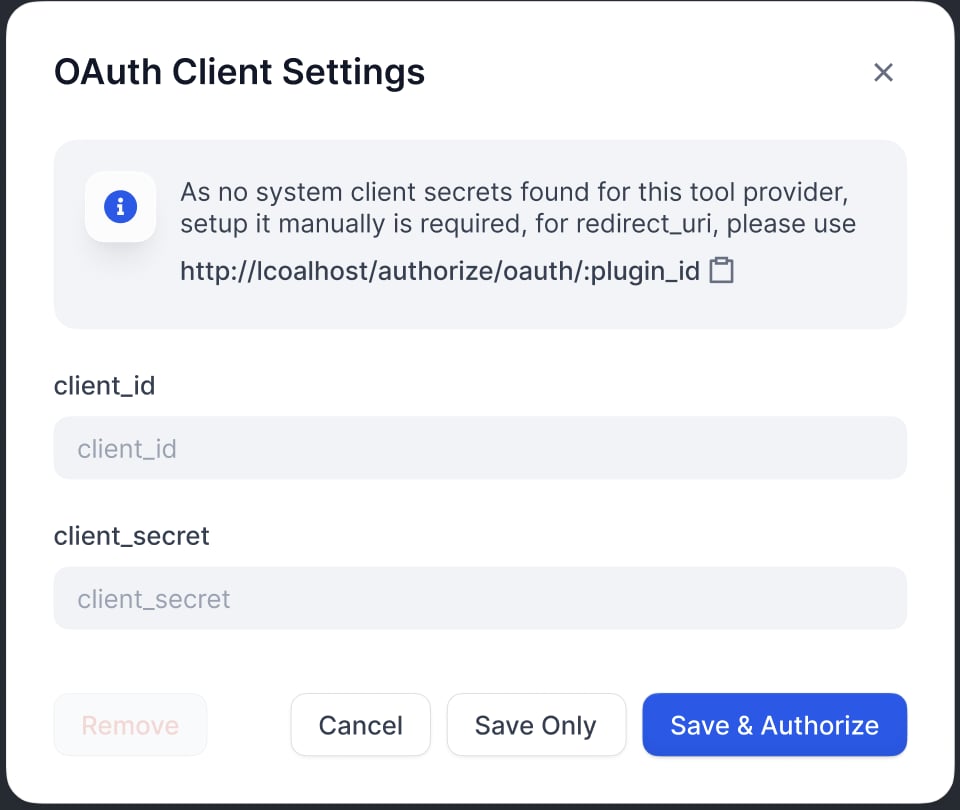 在 Google OAuth 客户端页面上注册 Dify 生成的重定向 URI:
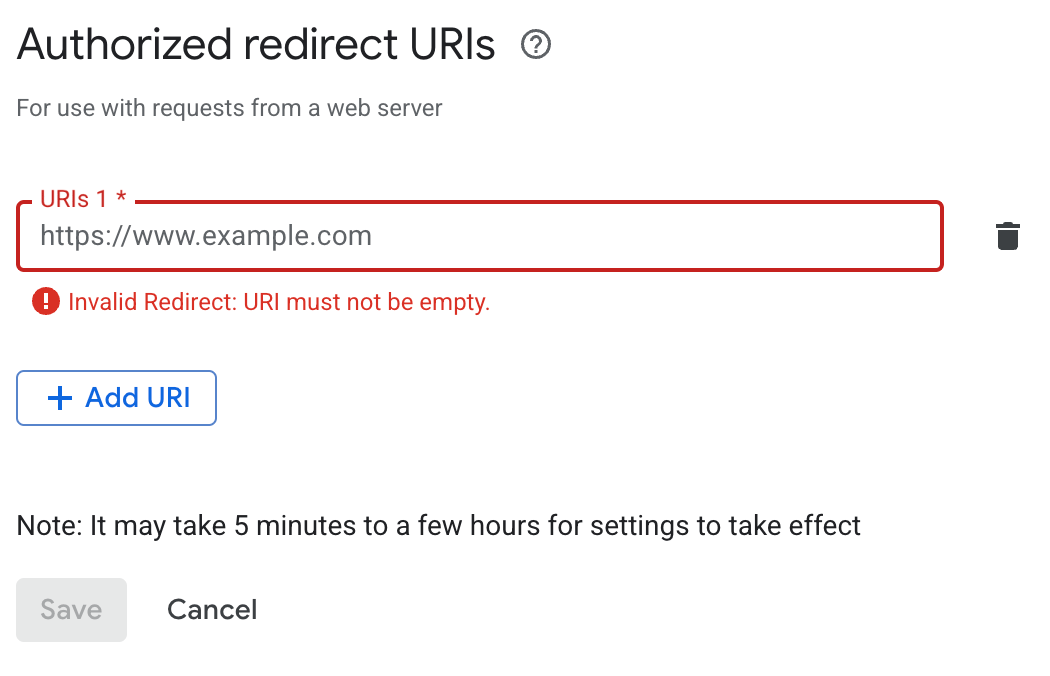 Dify 在 OAuth 客户端配置弹窗中显示 `redirect_uri`。它通常遵循以下格式:
```bash theme={null}
https://{your-dify-domain}/console/api/oauth/plugin/{plugin-id}/{provider-name}/{tool-name}/callback
```
对于自部署 Dify,`your-dify-domain` 应与 `CONSOLE_WEB_URL` 保持一致。
每个服务都有独特的要求,因此请务必查阅你所集成服务的具体 OAuth 文档。
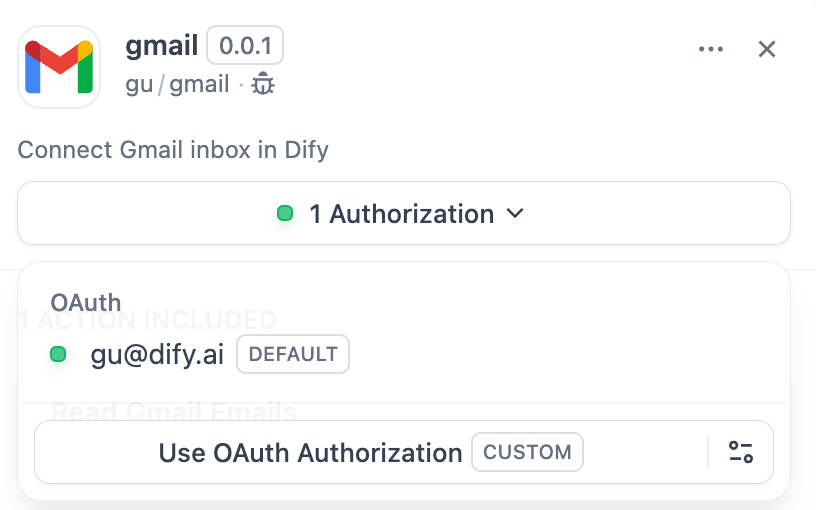
### 流程 2:用户授权(Dify 用户流程)
配置 OAuth 客户端后,Dify 用户可以授权你的插件访问他们的个人账户。
Dify 在 OAuth 客户端配置弹窗中显示 `redirect_uri`。它通常遵循以下格式:
```bash theme={null}
https://{your-dify-domain}/console/api/oauth/plugin/{plugin-id}/{provider-name}/{tool-name}/callback
```
对于自部署 Dify,`your-dify-domain` 应与 `CONSOLE_WEB_URL` 保持一致。
每个服务都有独特的要求,因此请务必查阅你所集成服务的具体 OAuth 文档。
### 流程 2:用户授权(Dify 用户流程)
配置 OAuth 客户端后,Dify 用户可以授权你的插件访问他们的个人账户。
 ## 实现
### 1. 在提供者清单中定义 OAuth Schema
提供者清单中的 `oauth_schema` 部分告诉 Dify,插件的 OAuth 设置需要哪些凭证,以及 OAuth 流程会产生什么。设置 OAuth 需要两个 schema:
#### client\_schema
定义 OAuth 客户端设置的输入:
```yaml gmail.yaml theme={null}
oauth_schema:
client_schema:
- name: "client_id"
type: "secret-input"
required: true
url: "https://developers.google.com/identity/protocols/oauth2"
- name: "client_secret"
type: "secret-input"
required: true
```
`url` 字段链接到第三方服务的帮助文档,为管理员和开发者在设置过程中提供参考。
#### credentials\_schema
指定用户授权流程产生的内容(Dify 自动管理这些):
```yaml theme={null}
# also under oauth_schema
credentials_schema:
- name: "access_token"
type: "secret-input"
- name: "refresh_token"
type: "secret-input"
- name: "expires_at"
type: "secret-input"
```
同时包含 `oauth_schema` 和 `credentials_for_provider`,可同时提供 OAuth 和 API 密钥两种认证选项。
### 2. 在工具提供者中完成必需的 OAuth 方法
在实现 `ToolProvider` 的位置添加以下导入:
```python theme={null}
from dify_plugin.entities.oauth import ToolOAuthCredentials
from dify_plugin.errors.tool import ToolProviderCredentialValidationError, ToolProviderOAuthError
```
你的 `ToolProvider` 类必须实现以下三个 OAuth 方法(以 `GmailProvider` 为例):
切勿在 `ToolOAuthCredentials` 的凭证中返回 `client_secret`,否则可能导致安全问题。
```python _oauth_get_authorization_url expandable theme={null}
def _oauth_get_authorization_url(self, redirect_uri: str, system_credentials: Mapping[str, Any]) -> str:
"""
Generate the authorization URL using credentials from OAuth Client Setup Flow.
This URL is where users grant permissions.
"""
# Generate random state for CSRF protection (recommended for all OAuth flows)
state = secrets.token_urlsafe(16)
# Define Gmail-specific scopes - request minimal necessary permissions
scope = "read:user read:data" # Replace with your required scopes
# Assemble Gmail-specific payload
params = {
"client_id": system_credentials["client_id"], # From OAuth Client Setup
"redirect_uri": redirect_uri, # Dify generates this - DON'T modify
"scope": scope,
"response_type": "code", # Standard OAuth authorization code flow
"access_type": "offline", # Critical: gets refresh token (if supported)
"prompt": "consent", # Forces reauth when scopes change (if supported)
"state": state, # CSRF protection
}
return f"{self._AUTH_URL}?{urllib.parse.urlencode(params)}"
```
```python _oauth_get_credentials expandable theme={null}
def _oauth_get_credentials(
self, redirect_uri: str, system_credentials: Mapping[str, Any], request: Request
) -> ToolOAuthCredentials:
"""
Exchange authorization code for access token and refresh token. This is called
to create ONE credential set for one account connection.
"""
# Extract authorization code from OAuth callback
code = request.args.get("code")
if not code:
raise ToolProviderOAuthError("Authorization code not provided")
# Check for authorization errors from OAuth provider
error = request.args.get("error")
if error:
error_description = request.args.get("error_description", "")
raise ToolProviderOAuthError(f"OAuth authorization failed: {error} - {error_description}")
# Exchange authorization code for tokens using OAuth Client Setup credentials
# Assemble Gmail-specific payload
data = {
"client_id": system_credentials["client_id"], # From OAuth Client Setup
"client_secret": system_credentials["client_secret"], # From OAuth Client Setup
"code": code, # From user's authorization
"grant_type": "authorization_code", # Standard OAuth flow type
"redirect_uri": redirect_uri, # Must exactly match authorization URL
}
headers = {"Content-Type": "application/x-www-form-urlencoded"}
try:
response = requests.post(
self._TOKEN_URL,
data=data,
headers=headers,
timeout=10
)
response.raise_for_status()
token_data = response.json()
# Handle OAuth provider errors in response
if "error" in token_data:
error_desc = token_data.get('error_description', token_data['error'])
raise ToolProviderOAuthError(f"Token exchange failed: {error_desc}")
access_token = token_data.get("access_token")
if not access_token:
raise ToolProviderOAuthError("No access token received from provider")
# Build credentials dict matching your credentials_schema
credentials = {
"access_token": access_token,
"token_type": token_data.get("token_type", "Bearer"),
}
# Include refresh token if provided (critical for long-term access)
refresh_token = token_data.get("refresh_token")
if refresh_token:
credentials["refresh_token"] = refresh_token
# Handle token expiration - some providers don't provide expires_in
expires_in = token_data.get("expires_in", 3600) # Default to 1 hour
expires_at = int(time.time()) + expires_in
return ToolOAuthCredentials(credentials=credentials, expires_at=expires_at)
except requests.RequestException as e:
raise ToolProviderOAuthError(f"Network error during token exchange: {str(e)}")
except Exception as e:
raise ToolProviderOAuthError(f"Failed to exchange authorization code: {str(e)}")
```
```python _oauth_refresh_credentials theme={null}
def _oauth_refresh_credentials(
self, redirect_uri: str, system_credentials: Mapping[str, Any], credentials: Mapping[str, Any]
) -> ToolOAuthCredentials:
"""
Refresh the credentials using the refresh token.
Dify calls this automatically when tokens expire.
"""
refresh_token = credentials.get("refresh_token")
if not refresh_token:
raise ToolProviderOAuthError("No refresh token available")
# Standard OAuth refresh token flow
data = {
"client_id": system_credentials["client_id"], # From OAuth Client Setup
"client_secret": system_credentials["client_secret"], # From OAuth Client Setup
"refresh_token": refresh_token, # From previous authorization
"grant_type": "refresh_token", # OAuth refresh flow
}
headers = {"Content-Type": "application/x-www-form-urlencoded"}
try:
response = requests.post(
self._TOKEN_URL,
data=data,
headers=headers,
timeout=10
)
response.raise_for_status()
token_data = response.json()
# Handle refresh errors
if "error" in token_data:
error_desc = token_data.get('error_description', token_data['error'])
raise ToolProviderOAuthError(f"Token refresh failed: {error_desc}")
access_token = token_data.get("access_token")
if not access_token:
raise ToolProviderOAuthError("No access token received from provider")
# Build new credentials, preserving existing refresh token
new_credentials = {
"access_token": access_token,
"token_type": token_data.get("token_type", "Bearer"),
"refresh_token": refresh_token, # Keep existing refresh token
}
# Handle token expiration
expires_in = token_data.get("expires_in", 3600)
# update refresh token if new one provided
new_refresh_token = token_data.get("refresh_token")
if new_refresh_token:
new_credentials["refresh_token"] = new_refresh_token
# Calculate new expiration timestamp for Dify's token management
expires_at = int(time.time()) + expires_in
return ToolOAuthCredentials(credentials=new_credentials, expires_at=expires_at)
except requests.RequestException as e:
raise ToolProviderOAuthError(f"Network error during token refresh: {str(e)}")
except Exception as e:
raise ToolProviderOAuthError(f"Failed to refresh credentials: {str(e)}")
```
### 3. 在工具中访问令牌
在 `Tool` 实现中使用 OAuth 凭证发起经过身份验证的 API 调用:
```python theme={null}
class YourTool(BuiltinTool):
def _invoke(self, user_id: str, tool_parameters: dict[str, Any]) -> ToolInvokeMessage:
if self.runtime.credential_type == CredentialType.OAUTH:
access_token = self.runtime.credentials["access_token"]
response = requests.get("https://api.service.com/data",
headers={"Authorization": f"Bearer {access_token}"})
return self.create_text_message(response.text)
```
`self.runtime.credentials` 自动提供当前用户的令牌。Dify 自动处理刷新。
对于同时支持 OAuth 和 `API_KEY` 认证的插件,可使用 `self.runtime.credential_type` 来区分这两种认证类型。
### 4. 指定正确的版本
OAuth 需要较新版本的 SDK 和 Dify。在 `requirements.txt` 中固定插件 SDK 版本:
```text theme={null}
dify_plugin>=0.5.0
```
在 `manifest.yaml` 中,添加最低 Dify 版本:
```yaml theme={null}
meta:
version: 0.0.1
arch:
- amd64
- arm64
runner:
language: python
version: "3.12"
entrypoint: main
minimum_dify_version: 1.7.1
```
## 实现
### 1. 在提供者清单中定义 OAuth Schema
提供者清单中的 `oauth_schema` 部分告诉 Dify,插件的 OAuth 设置需要哪些凭证,以及 OAuth 流程会产生什么。设置 OAuth 需要两个 schema:
#### client\_schema
定义 OAuth 客户端设置的输入:
```yaml gmail.yaml theme={null}
oauth_schema:
client_schema:
- name: "client_id"
type: "secret-input"
required: true
url: "https://developers.google.com/identity/protocols/oauth2"
- name: "client_secret"
type: "secret-input"
required: true
```
`url` 字段链接到第三方服务的帮助文档,为管理员和开发者在设置过程中提供参考。
#### credentials\_schema
指定用户授权流程产生的内容(Dify 自动管理这些):
```yaml theme={null}
# also under oauth_schema
credentials_schema:
- name: "access_token"
type: "secret-input"
- name: "refresh_token"
type: "secret-input"
- name: "expires_at"
type: "secret-input"
```
同时包含 `oauth_schema` 和 `credentials_for_provider`,可同时提供 OAuth 和 API 密钥两种认证选项。
### 2. 在工具提供者中完成必需的 OAuth 方法
在实现 `ToolProvider` 的位置添加以下导入:
```python theme={null}
from dify_plugin.entities.oauth import ToolOAuthCredentials
from dify_plugin.errors.tool import ToolProviderCredentialValidationError, ToolProviderOAuthError
```
你的 `ToolProvider` 类必须实现以下三个 OAuth 方法(以 `GmailProvider` 为例):
切勿在 `ToolOAuthCredentials` 的凭证中返回 `client_secret`,否则可能导致安全问题。
```python _oauth_get_authorization_url expandable theme={null}
def _oauth_get_authorization_url(self, redirect_uri: str, system_credentials: Mapping[str, Any]) -> str:
"""
Generate the authorization URL using credentials from OAuth Client Setup Flow.
This URL is where users grant permissions.
"""
# Generate random state for CSRF protection (recommended for all OAuth flows)
state = secrets.token_urlsafe(16)
# Define Gmail-specific scopes - request minimal necessary permissions
scope = "read:user read:data" # Replace with your required scopes
# Assemble Gmail-specific payload
params = {
"client_id": system_credentials["client_id"], # From OAuth Client Setup
"redirect_uri": redirect_uri, # Dify generates this - DON'T modify
"scope": scope,
"response_type": "code", # Standard OAuth authorization code flow
"access_type": "offline", # Critical: gets refresh token (if supported)
"prompt": "consent", # Forces reauth when scopes change (if supported)
"state": state, # CSRF protection
}
return f"{self._AUTH_URL}?{urllib.parse.urlencode(params)}"
```
```python _oauth_get_credentials expandable theme={null}
def _oauth_get_credentials(
self, redirect_uri: str, system_credentials: Mapping[str, Any], request: Request
) -> ToolOAuthCredentials:
"""
Exchange authorization code for access token and refresh token. This is called
to create ONE credential set for one account connection.
"""
# Extract authorization code from OAuth callback
code = request.args.get("code")
if not code:
raise ToolProviderOAuthError("Authorization code not provided")
# Check for authorization errors from OAuth provider
error = request.args.get("error")
if error:
error_description = request.args.get("error_description", "")
raise ToolProviderOAuthError(f"OAuth authorization failed: {error} - {error_description}")
# Exchange authorization code for tokens using OAuth Client Setup credentials
# Assemble Gmail-specific payload
data = {
"client_id": system_credentials["client_id"], # From OAuth Client Setup
"client_secret": system_credentials["client_secret"], # From OAuth Client Setup
"code": code, # From user's authorization
"grant_type": "authorization_code", # Standard OAuth flow type
"redirect_uri": redirect_uri, # Must exactly match authorization URL
}
headers = {"Content-Type": "application/x-www-form-urlencoded"}
try:
response = requests.post(
self._TOKEN_URL,
data=data,
headers=headers,
timeout=10
)
response.raise_for_status()
token_data = response.json()
# Handle OAuth provider errors in response
if "error" in token_data:
error_desc = token_data.get('error_description', token_data['error'])
raise ToolProviderOAuthError(f"Token exchange failed: {error_desc}")
access_token = token_data.get("access_token")
if not access_token:
raise ToolProviderOAuthError("No access token received from provider")
# Build credentials dict matching your credentials_schema
credentials = {
"access_token": access_token,
"token_type": token_data.get("token_type", "Bearer"),
}
# Include refresh token if provided (critical for long-term access)
refresh_token = token_data.get("refresh_token")
if refresh_token:
credentials["refresh_token"] = refresh_token
# Handle token expiration - some providers don't provide expires_in
expires_in = token_data.get("expires_in", 3600) # Default to 1 hour
expires_at = int(time.time()) + expires_in
return ToolOAuthCredentials(credentials=credentials, expires_at=expires_at)
except requests.RequestException as e:
raise ToolProviderOAuthError(f"Network error during token exchange: {str(e)}")
except Exception as e:
raise ToolProviderOAuthError(f"Failed to exchange authorization code: {str(e)}")
```
```python _oauth_refresh_credentials theme={null}
def _oauth_refresh_credentials(
self, redirect_uri: str, system_credentials: Mapping[str, Any], credentials: Mapping[str, Any]
) -> ToolOAuthCredentials:
"""
Refresh the credentials using the refresh token.
Dify calls this automatically when tokens expire.
"""
refresh_token = credentials.get("refresh_token")
if not refresh_token:
raise ToolProviderOAuthError("No refresh token available")
# Standard OAuth refresh token flow
data = {
"client_id": system_credentials["client_id"], # From OAuth Client Setup
"client_secret": system_credentials["client_secret"], # From OAuth Client Setup
"refresh_token": refresh_token, # From previous authorization
"grant_type": "refresh_token", # OAuth refresh flow
}
headers = {"Content-Type": "application/x-www-form-urlencoded"}
try:
response = requests.post(
self._TOKEN_URL,
data=data,
headers=headers,
timeout=10
)
response.raise_for_status()
token_data = response.json()
# Handle refresh errors
if "error" in token_data:
error_desc = token_data.get('error_description', token_data['error'])
raise ToolProviderOAuthError(f"Token refresh failed: {error_desc}")
access_token = token_data.get("access_token")
if not access_token:
raise ToolProviderOAuthError("No access token received from provider")
# Build new credentials, preserving existing refresh token
new_credentials = {
"access_token": access_token,
"token_type": token_data.get("token_type", "Bearer"),
"refresh_token": refresh_token, # Keep existing refresh token
}
# Handle token expiration
expires_in = token_data.get("expires_in", 3600)
# update refresh token if new one provided
new_refresh_token = token_data.get("refresh_token")
if new_refresh_token:
new_credentials["refresh_token"] = new_refresh_token
# Calculate new expiration timestamp for Dify's token management
expires_at = int(time.time()) + expires_in
return ToolOAuthCredentials(credentials=new_credentials, expires_at=expires_at)
except requests.RequestException as e:
raise ToolProviderOAuthError(f"Network error during token refresh: {str(e)}")
except Exception as e:
raise ToolProviderOAuthError(f"Failed to refresh credentials: {str(e)}")
```
### 3. 在工具中访问令牌
在 `Tool` 实现中使用 OAuth 凭证发起经过身份验证的 API 调用:
```python theme={null}
class YourTool(BuiltinTool):
def _invoke(self, user_id: str, tool_parameters: dict[str, Any]) -> ToolInvokeMessage:
if self.runtime.credential_type == CredentialType.OAUTH:
access_token = self.runtime.credentials["access_token"]
response = requests.get("https://api.service.com/data",
headers={"Authorization": f"Bearer {access_token}"})
return self.create_text_message(response.text)
```
`self.runtime.credentials` 自动提供当前用户的令牌。Dify 自动处理刷新。
对于同时支持 OAuth 和 `API_KEY` 认证的插件,可使用 `self.runtime.credential_type` 来区分这两种认证类型。
### 4. 指定正确的版本
OAuth 需要较新版本的 SDK 和 Dify。在 `requirements.txt` 中固定插件 SDK 版本:
```text theme={null}
dify_plugin>=0.5.0
```
在 `manifest.yaml` 中,添加最低 Dify 版本:
```yaml theme={null}
meta:
version: 0.0.1
arch:
- amd64
- arm64
runner:
language: python
version: "3.12"
entrypoint: main
minimum_dify_version: 1.7.1
```