> ## Documentation Index
> Fetch the complete documentation index at: https://dify-6c0370d8-docs-new-agent-experience.mintlify.site/llms.txt
> Use this file to discover all available pages before exploring further.
# 工具插件
> 从初始化到打包,以 Google Search 为示例完整开发一个 Dify 工具插件
> 本文档由 AI 自动翻译。如有任何不准确之处,请参考 [英文原版](/en/develop-plugin/dev-guides-and-walkthroughs/tool-plugin)。
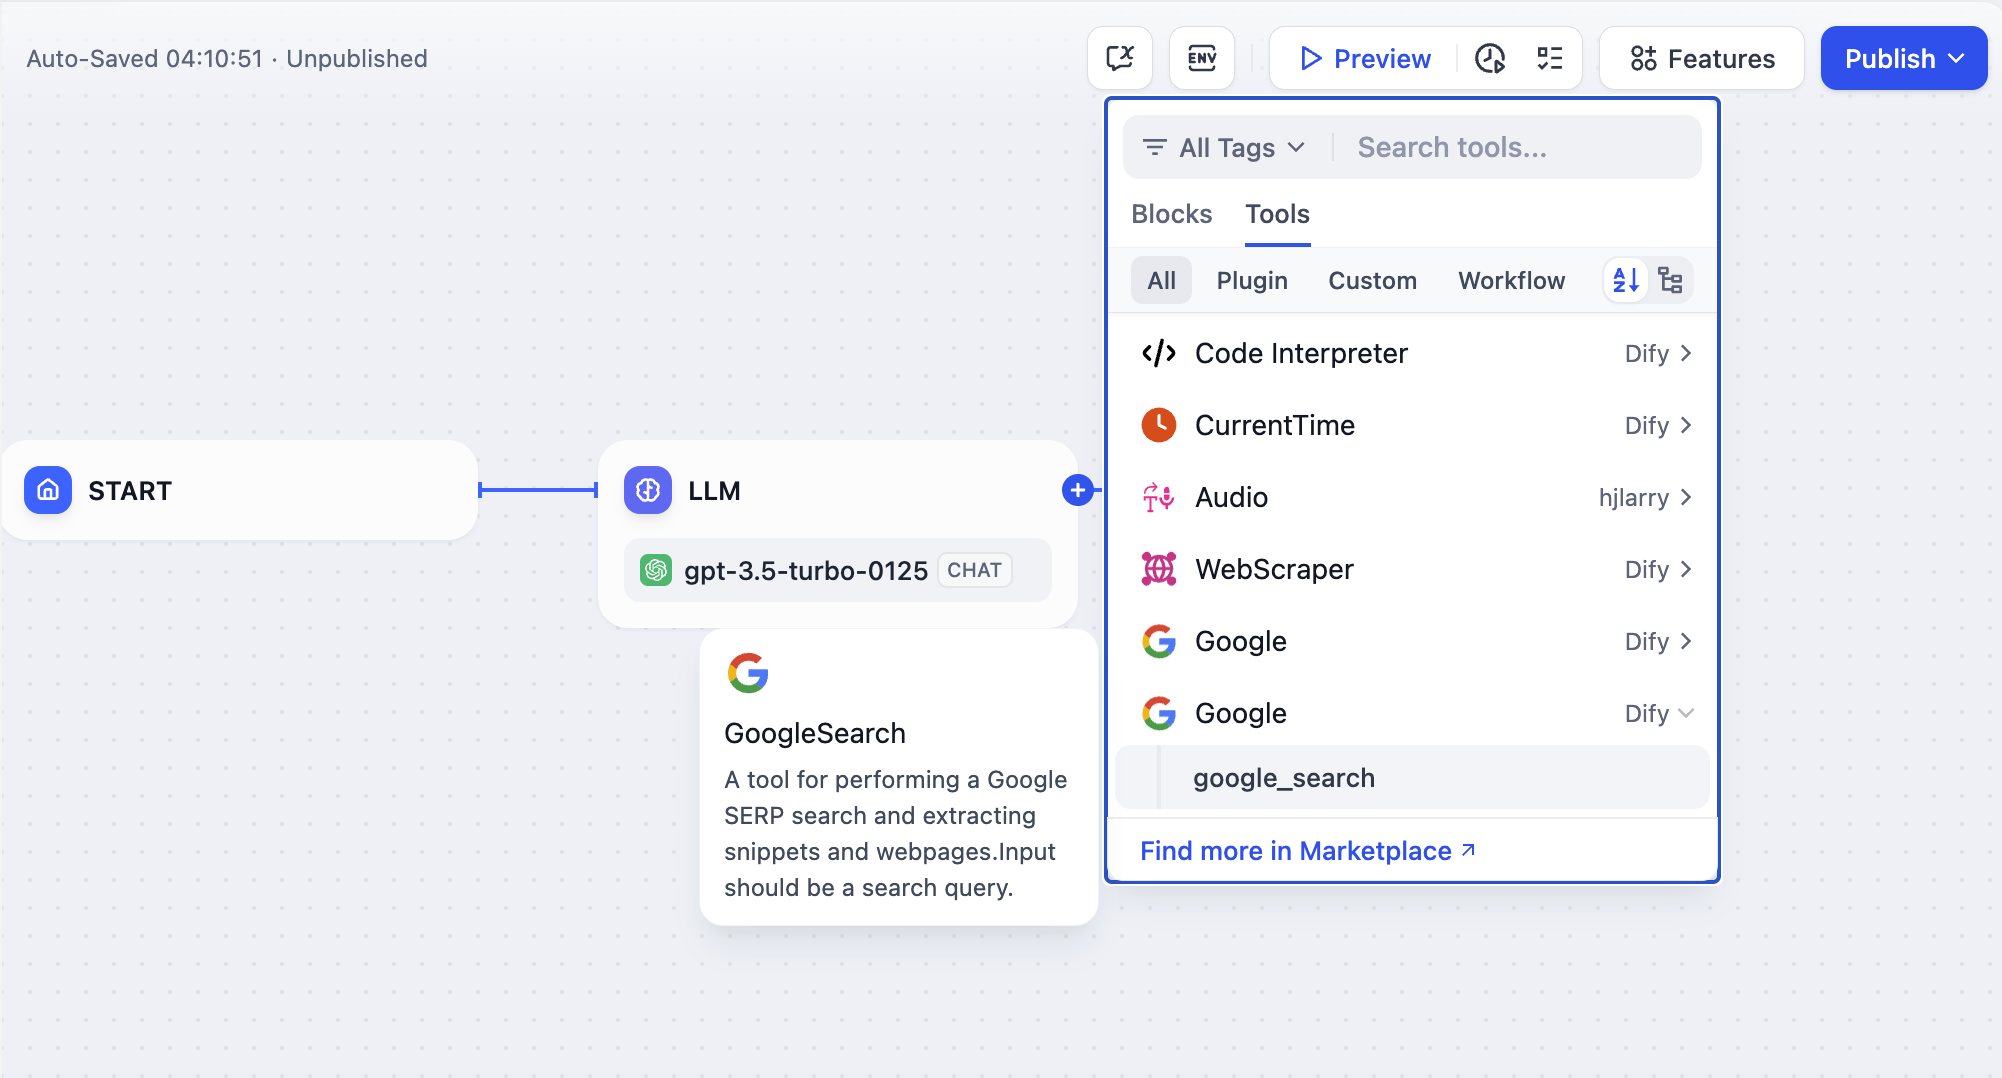
工具是 Chatflow、Workflow 和 Agent 应用可以调用的第三方服务,能为 Dify 应用扩展在线搜索、图像生成等能力。
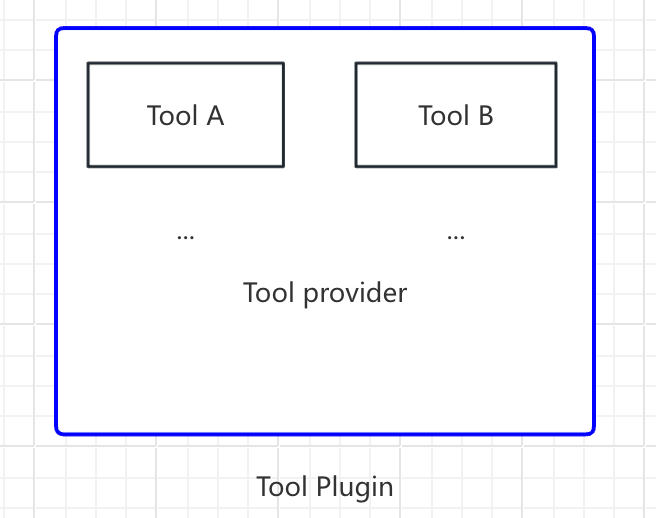
本指南中的 **工具插件** 是一个完整的项目,包含工具提供者文件、功能代码及配套结构。一个工具提供者可以打包多个工具,每个工具提供一项独立的能力:
```text theme={null}
- Tool Provider
- Tool A
- Tool B
```
本指南以 Google Search 为例,逐步介绍工具插件的开发过程。
## 前置条件
* Dify 插件脚手架工具
* Python 环境(版本 3.12)
关于如何配置脚手架工具,参见 [初始化开发工具](/zh/develop-plugin/getting-started/cli)。
## 创建新项目
运行脚手架命令行工具来创建一个新的 Dify 插件项目。
```bash theme={null}
./dify-plugin-darwin-arm64 plugin init
```
如果你已将二进制文件重命名为 `dify` 并复制到 `/usr/local/bin` 路径,可以运行以下命令来创建新的插件项目:
```bash theme={null}
dify plugin init
```
以下示例使用 `dify` 作为命令。如果遇到问题,请将 `dify` 替换为命令行工具的路径。
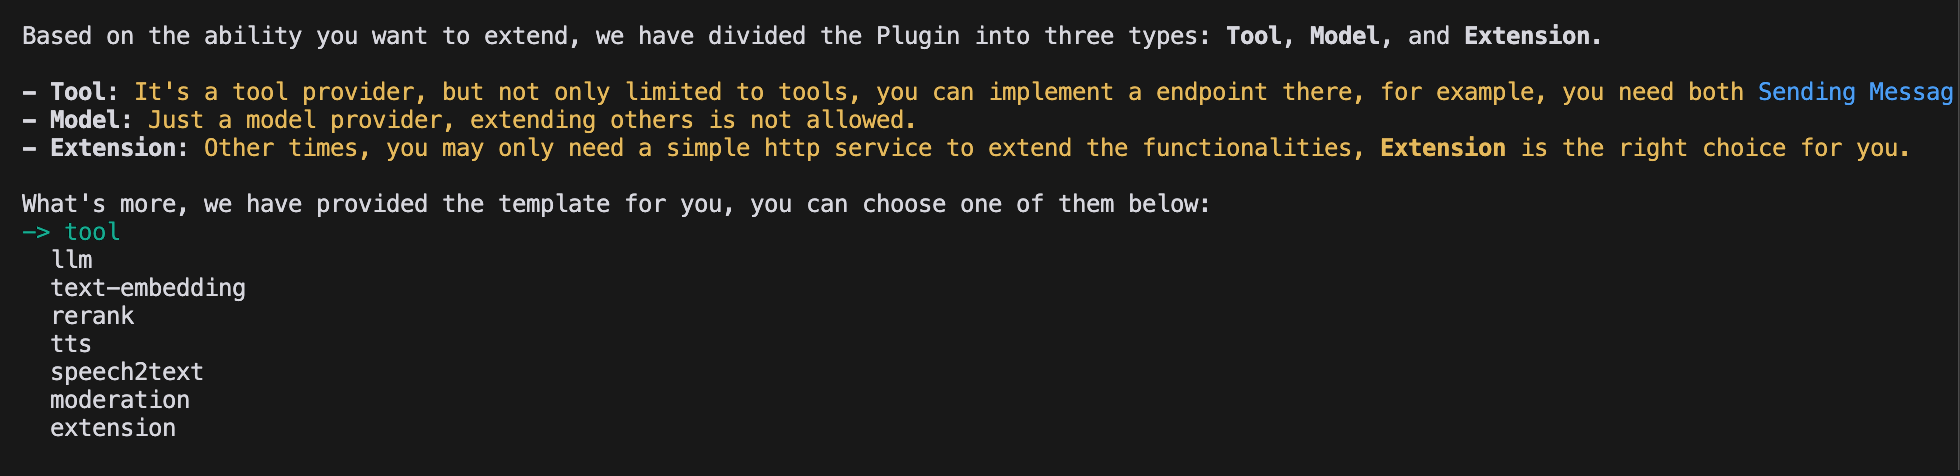
## 选择插件类型和模板
脚手架工具中的每个模板都是一个完整的代码项目。本示例选择 `Tool` 插件。
如果你已熟悉插件开发且不需要模板,参见 [通用规范](/zh/develop-plugin/features-and-specs/plugin-types/general-specifications) 指南,构建任意类型的插件。
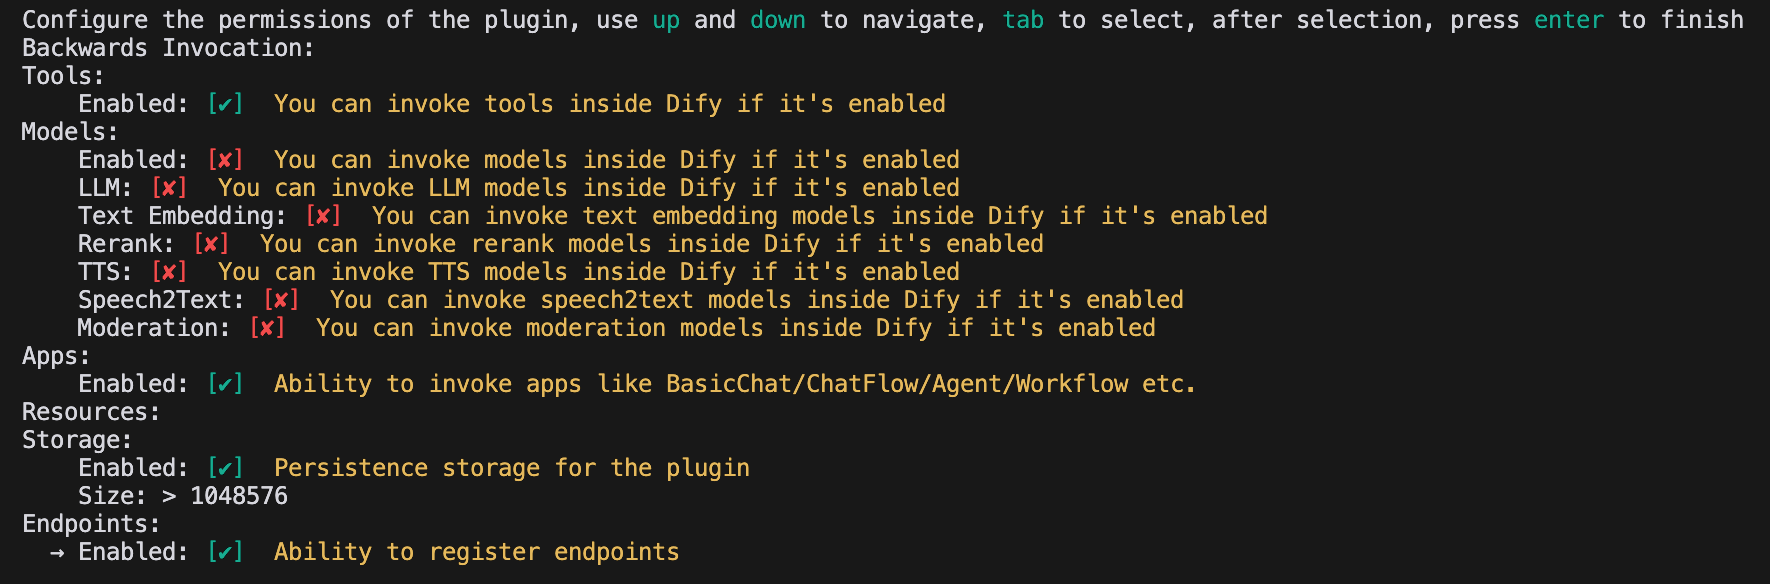
### 配置插件权限
插件还需要从 Dify 平台读取数据的权限。为本示例插件授予以下权限:
* Tools
* Apps
* 启用持久化存储,并分配默认大小
* 允许注册 Endpoints
在终端中使用方向键选择权限,使用 Tab 键授予权限。
勾选所有权限项后,按 Enter 完成插件创建。系统将自动生成插件项目代码。
## 开发工具插件
### 1. 创建工具提供者文件
工具提供者文件是一个 YAML 文件,作为插件的基础配置,为工具提供所需的授权信息。
在插件模板项目中,进入 `/provider` 目录,将 YAML 文件重命名为 `google.yaml`。该文件描述工具提供者:名称、图标、作者等详细信息,这些信息会在安装插件时显示。
示例代码:
```yaml theme={null}
identity: # Basic information of the tool provider
author: Your-name # Author
name: google # Name, unique, cannot have the same name as other providers
label: # Label, for frontend display
en_US: Google # English label
zh_Hans: Google # Chinese label
description: # Description, for frontend display
en_US: Google # English description
zh_Hans: Google # Chinese description
icon: icon.svg # Tool icon, needs to be placed in the _assets folder
tags: # Tags, for frontend display
- search
```
确保文件路径在 `/tools` 目录中,完整路径如下:
```yaml theme={null}
plugins:
tools:
- 'google.yaml'
```
`google.yaml` 必须使用其在插件项目中的绝对路径引用;本示例中它位于项目根目录。YAML 文件中的 `identity` 包含工具提供者的基本信息:作者、名称、标签、描述和图标。
* 图标必须是附件资源,放置在项目根目录的 `_assets` 文件夹中。
* 标签帮助用户按分类查找插件。以下是目前支持的所有标签:
```python theme={null}
class ToolLabelEnum(Enum):
SEARCH = 'search'
IMAGE = 'image'
VIDEOS = 'videos'
WEATHER = 'weather'
FINANCE = 'finance'
DESIGN = 'design'
TRAVEL = 'travel'
SOCIAL = 'social'
NEWS = 'news'
MEDICAL = 'medical'
PRODUCTIVITY = 'productivity'
EDUCATION = 'education'
BUSINESS = 'business'
ENTERTAINMENT = 'entertainment'
UTILITIES = 'utilities'
OTHER = 'other'
```
### 2. 添加第三方服务凭据
为方便开发,本示例使用第三方服务 SerpApi 提供的 Google Search API。SerpApi 需要 API Key,因此在 YAML 文件中添加 `credentials_for_provider` 字段。
完整代码:
```yaml theme={null}
identity:
author: Dify
name: google
label:
en_US: Google
zh_Hans: Google
pt_BR: Google
description:
en_US: Google
zh_Hans: GoogleSearch
pt_BR: Google
icon: icon.svg
tags:
- search
credentials_for_provider: #Add credentials_for_provider field
serpapi_api_key:
type: secret-input
required: true
label:
en_US: SerpApi API key
zh_Hans: SerpApi API key
placeholder:
en_US: Please input your SerpApi API key
zh_Hans: Please enter your SerpApi API key
help:
en_US: Get your SerpApi API key from SerpApi
zh_Hans: Get your SerpApi API key from SerpApi
url: https://serpapi.com/manage-api-key
tools:
- tools/google_search.yaml
extra:
python:
source: google.py
```
* `credentials_for_provider` 的子级结构必须满足 [通用规范](/zh/develop-plugin/features-and-specs/plugin-types/general-specifications) 的要求。
* 指定提供者包含哪些工具。本示例只包含一个文件 `tools/google_search.yaml`。
* 除基本信息外,提供者还需要代码逻辑,因此需指定其实现文件。本示例使用 `google.py`,但暂不实现,先编写 `google_search` 工具代码。
### 3. 填写工具 YAML 文件
一个工具插件可以包含多个工具,每个工具由各自的 YAML 文件描述,涵盖基本信息、参数和输出。
继续以 `GoogleSearch` 工具为例,在 `/tools` 文件夹中创建一个新的 `google_search.yaml` 文件。
```yaml theme={null}
identity:
name: google_search
author: Dify
label:
en_US: GoogleSearch
zh_Hans: Google Search
pt_BR: GoogleSearch
description:
human:
en_US: A tool for performing a Google SERP search and extracting snippets and webpages. Input should be a search query.
zh_Hans: A tool for performing a Google SERP search and extracting snippets and webpages. Input should be a search query.
pt_BR: A tool for performing a Google SERP search and extracting snippets and webpages. Input should be a search query.
llm: A tool for performing a Google SERP search and extracting snippets and webpages. Input should be a search query.
parameters:
- name: query
type: string
required: true
label:
en_US: Query string
zh_Hans: Query string
pt_BR: Query string
human_description:
en_US: used for searching
zh_Hans: used for searching web content
pt_BR: used for searching
llm_description: key words for searching
form: llm
extra:
python:
source: tools/google_search.py
```
* **`identity`**:工具的基本信息,包括名称、作者、标签和描述。
* **`parameters`**:参数列表。
* **`name`**(必填):参数名称,在工具的参数中必须唯一。
* **`type`**(必填):参数类型。可选值为 `string`、`number`、`boolean`、`select`、`secret-input`,分别渲染为字符串、数字、布尔值、下拉框、加密输入框。敏感信息请使用 `secret-input`。
* **`label`**(必填):参数标签,显示在前端。
* **`form`**(必填):表单类型,可选 `llm` 或 `form`。
* 在 Agent 应用中,`llm` 表示由 LLM 自行推断参数,`form` 表示可在使用工具前预先设置参数。
* 在 Workflow 应用中,`llm` 和 `form` 参数都通过前端填写,但 `llm` 参数会用作工具节点的输入变量。
* **`required`**(可选):参数是否必填。
* 在 `llm` 模式下,必填参数必须由 Agent 推断。
* 在 `form` 模式下,必填参数必须在对话开始前于前端填写。
* **`options`**(可选):参数选项。
* 在 `llm` 模式下,Dify 会将所有选项传递给 LLM,由其据此推断。
* 在 `form` 模式下,当 `type` 为 `select` 时,前端会显示这些选项。
* **`default`**(可选):默认值。
* **`min`**(可选):最小值,参数类型为 `number` 时适用。
* **`max`**(可选):最大值,参数类型为 `number` 时适用。
* **`human_description`**(可选):显示在前端的说明,支持多语言。
* **`placeholder`**(可选):输入字段的提示文本,当表单类型为 `form` 且参数类型为 `string`、`number` 或 `secret-input` 时适用。支持多语言。
* **`llm_description`**(可选):传递给 LLM 的说明。请尽可能详细地描述,以便 LLM 理解该参数。
### 4. 编写工具代码
完成工具配置后,编写实现工具逻辑的代码。在 `/tools` 目录中创建 `google_search.py`,内容如下:
```python theme={null}
from collections.abc import Generator
from typing import Any
import requests
from dify_plugin import Tool
from dify_plugin.entities.tool import ToolInvokeMessage
SERP_API_URL = "https://serpapi.com/search"
class GoogleSearchTool(Tool):
def _parse_response(self, response: dict) -> dict:
result = {}
if "knowledge_graph" in response:
result["title"] = response["knowledge_graph"].get("title", "")
result["description"] = response["knowledge_graph"].get("description", "")
if "organic_results" in response:
result["organic_results"] = [
{
"title": item.get("title", ""),
"link": item.get("link", ""),
"snippet": item.get("snippet", ""),
}
for item in response["organic_results"]
]
return result
def _invoke(self, tool_parameters: dict[str, Any]) -> Generator[ToolInvokeMessage]:
params = {
"api_key": self.runtime.credentials["serpapi_api_key"],
"q": tool_parameters["query"],
"engine": "google",
"google_domain": "google.com",
"gl": "us",
"hl": "en",
}
response = requests.get(url=SERP_API_URL, params=params, timeout=5)
response.raise_for_status()
valuable_res = self._parse_response(response.json())
yield self.create_json_message(valuable_res)
```
这段代码向 `serpapi` 发送请求,并使用 `self.create_json_message` 返回格式化的 JSON 数据。如需了解更多返回数据类型,参见 [远程调试插件](/zh/develop-plugin/features-and-specs/plugin-types/remote-debug-a-plugin) 和 [持久化存储 KV](/zh/develop-plugin/features-and-specs/plugin-types/persistent-storage-kv)。
### 5. 完善工具提供者代码
最后,实现提供者的凭据验证逻辑。如果验证失败,代码会抛出 `ToolProviderCredentialValidationError` 异常;验证成功后,会正确请求 `google_search` 工具服务。
在 `/provider` 目录中创建 `google.py` 文件,内容如下:
```python theme={null}
from typing import Any
from dify_plugin import ToolProvider
from dify_plugin.errors.tool import ToolProviderCredentialValidationError
from tools.google_search import GoogleSearchTool
class GoogleProvider(ToolProvider):
def _validate_credentials(self, credentials: dict[str, Any]) -> None:
try:
for _ in GoogleSearchTool.from_credentials(credentials).invoke(
tool_parameters={"query": "test", "result_type": "link"},
):
pass
except Exception as e:
raise ToolProviderCredentialValidationError(str(e))
```
## 调试插件
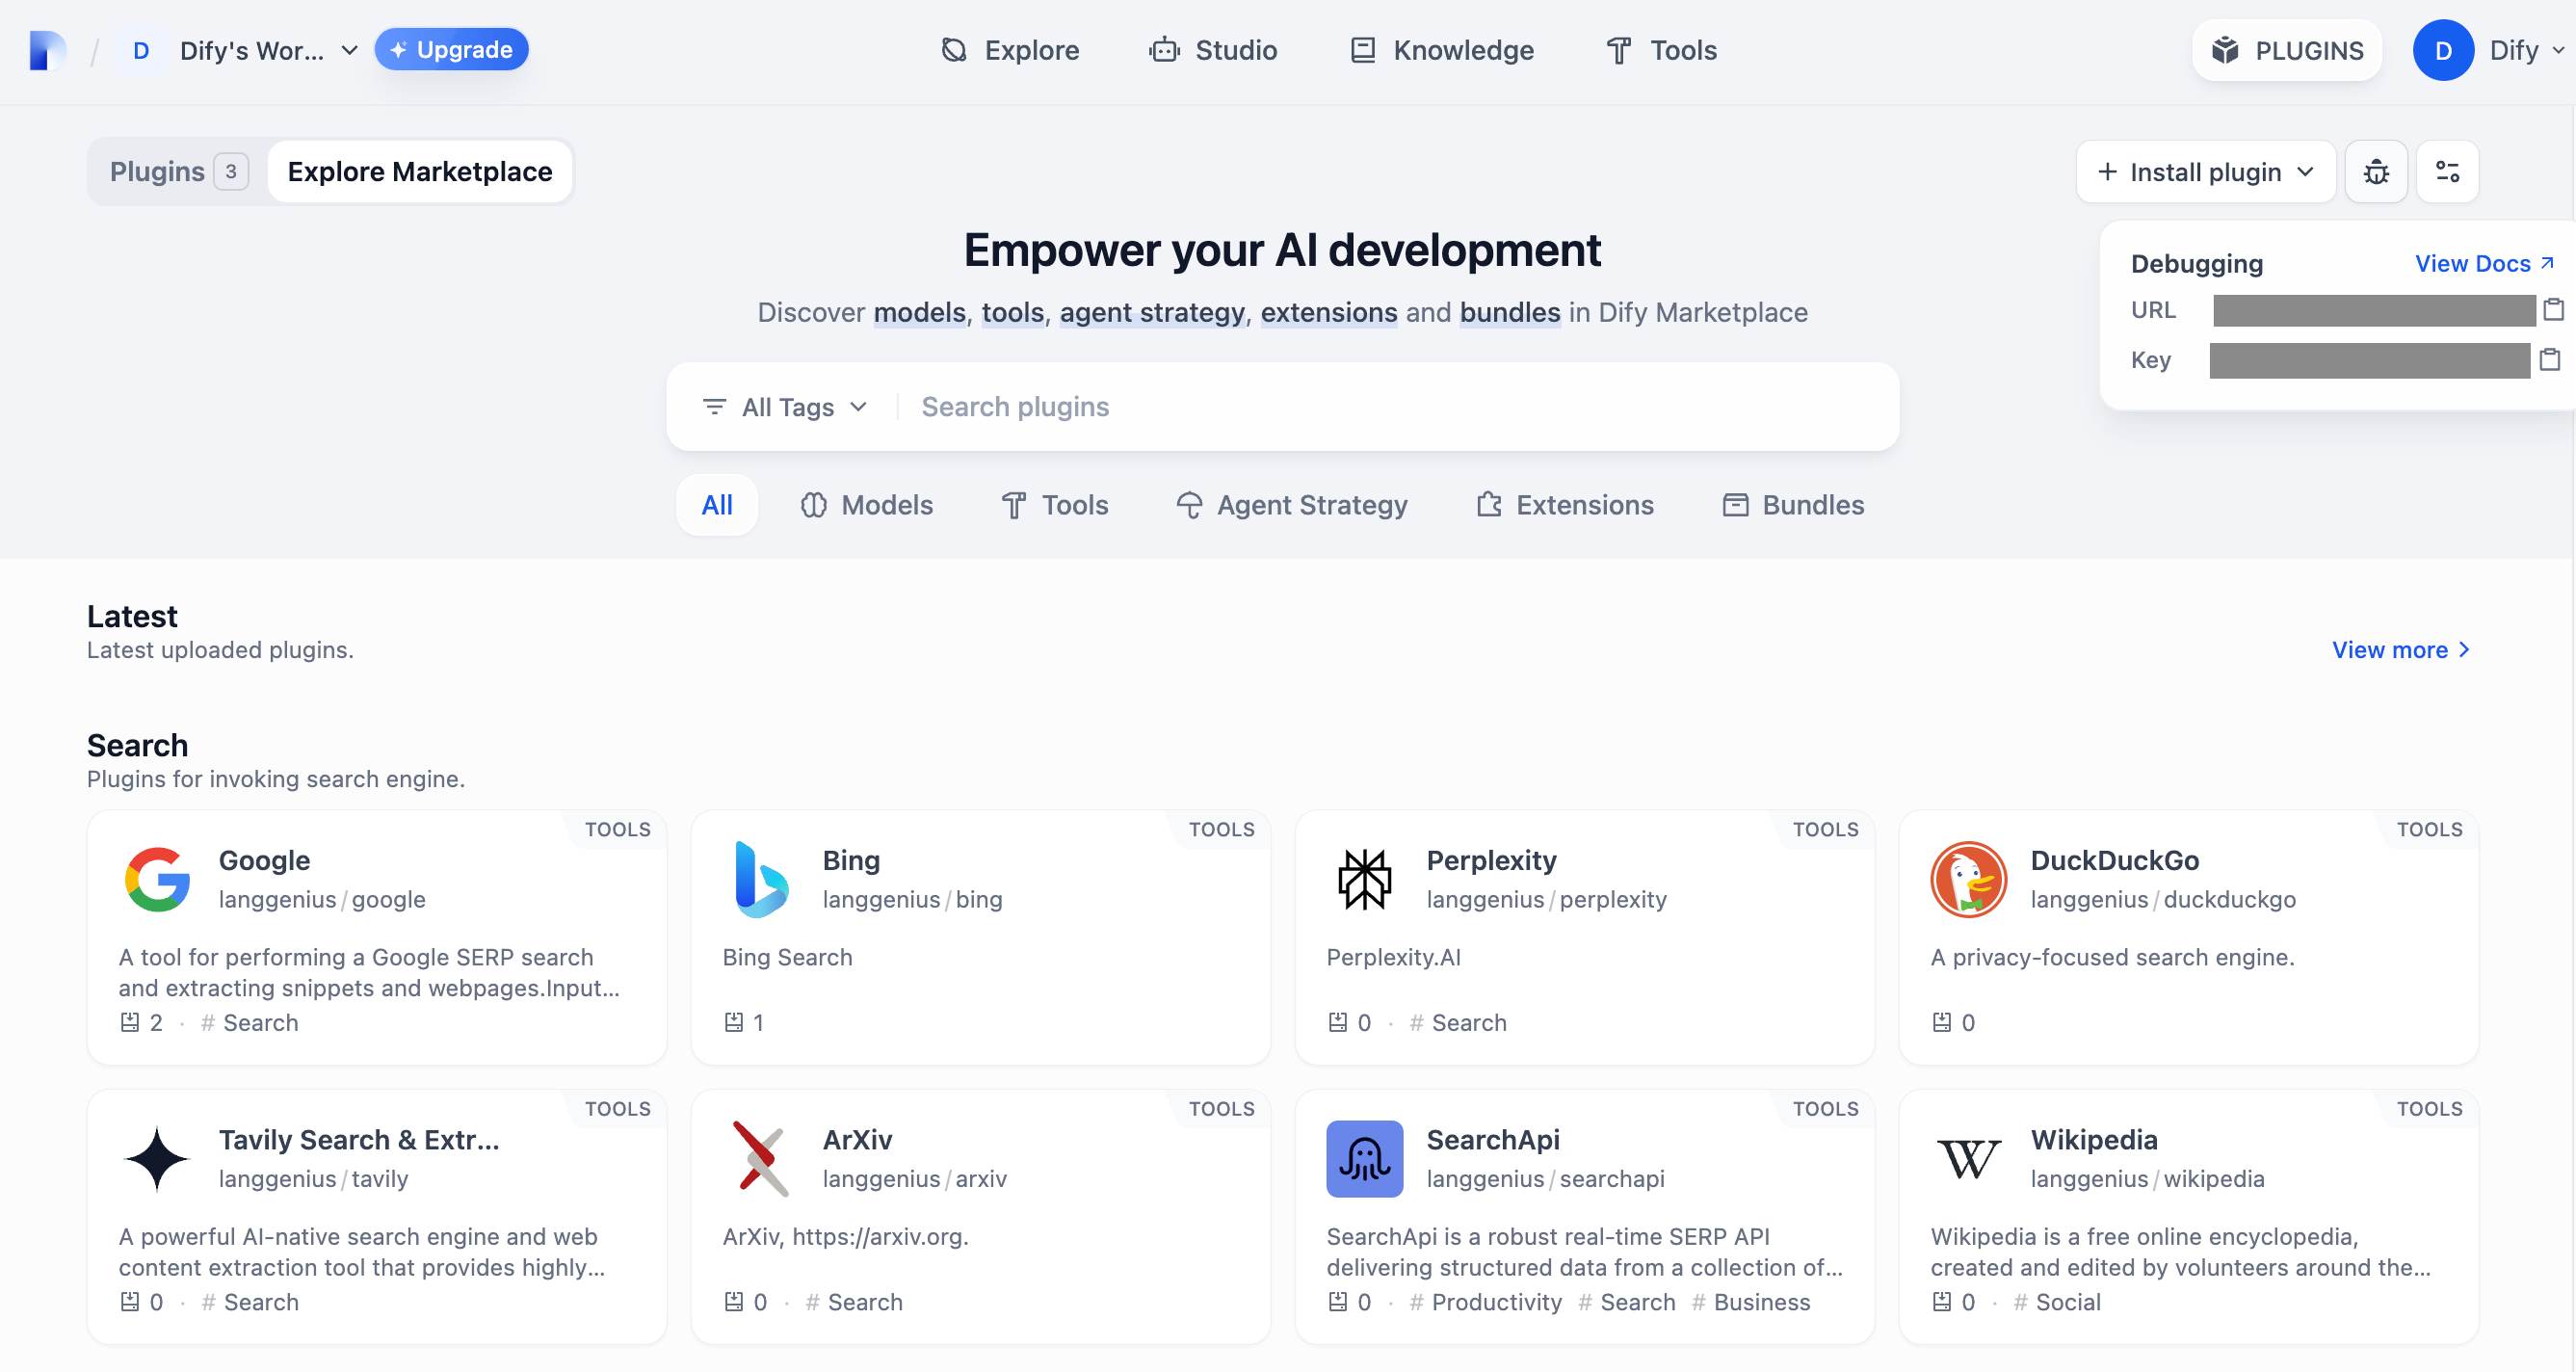
开发完成后,测试插件是否正常工作。Dify 提供远程调试,帮助你在测试环境中快速验证插件功能。
前往 [插件管理](https://cloud.dify.ai/plugins) 页面获取远程服务器地址和调试 Key。
返回插件项目,复制 `.env.example` 文件并重命名为 `.env`,然后填入远程服务器地址和调试 Key。
`.env` 文件:
```bash theme={null}
INSTALL_METHOD=remote
REMOTE_INSTALL_URL=debug.dify.ai:5003
REMOTE_INSTALL_KEY=********-****-****-****-************
```
运行 `python -m main` 启动插件。在 **插件** 页面,可以看到插件已安装在工作空间中,团队的其他成员也可以访问该插件。

## 打包插件(可选)
插件正常运行后,使用以下命令打包并命名插件。运行后会在当前文件夹生成一个 `google.difypkg` 文件,即最终的插件包。
```bash theme={null}
# Replace ./google with the actual path of the plugin project
dify plugin package ./google
```
恭喜,你已完成工具插件的开发、调试和打包!
## 发布插件(可选)
如需将插件发布到 Dify 市场,请确保插件符合 [发布到 Dify 市场](/zh/develop-plugin/publishing/marketplace-listing/release-to-dify-marketplace) 中的规范。通过审核后,代码会合并到主分支并自动上架到 [Dify 市场](https://marketplace.dify.ai/)。
完整流程参见 [发布概述](/zh/develop-plugin/publishing/marketplace-listing/release-overview)。
## 探索更多
### 快速开始
* [开发扩展插件](/zh/develop-plugin/dev-guides-and-walkthroughs/endpoint)
* [开发模型插件](/zh/develop-plugin/dev-guides-and-walkthroughs/creating-new-model-provider)
* [Bundle 插件:打包多个插件](/zh/develop-plugin/features-and-specs/advanced-development/bundle)
### 插件接口文档
* [通用规范](/zh/develop-plugin/features-and-specs/plugin-types/general-specifications):Manifest 结构和工具规范。
* [Endpoint](/zh/develop-plugin/dev-guides-and-walkthroughs/endpoint):详细的 Endpoint 定义。
* [反向调用](/zh/develop-plugin/features-and-specs/advanced-development/reverse-invocation):反向调用 Dify 能力。
* [模型 Schema](/zh/develop-plugin/features-and-specs/plugin-types/model-schema):模型。
* [Agent 插件](/zh/develop-plugin/features-and-specs/advanced-development/reverse-invocation):扩展 Agent 策略。
## 下一步
* [远程调试插件](/zh/develop-plugin/features-and-specs/plugin-types/remote-debug-a-plugin):学习更多高级调试技巧。
* [持久化存储](/zh/develop-plugin/features-and-specs/plugin-types/persistent-storage-kv):在插件中使用数据存储。
* [Slack Bot 插件开发示例](/zh/develop-plugin/dev-guides-and-walkthroughs/develop-a-slack-bot-plugin):更复杂的插件开发案例。
* [工具插件](/zh/develop-plugin/features-and-specs/plugin-types/tool):工具插件的高级功能。